
18 Sep Another five ways to speed up Windows 10
If you want to optimize Windows 10, take a few minutes to try out these tips to speed up your PC and make it less prone to performance and system issues.
Want Windows 10 to run faster? We’ve got help. In just a few minutes you can try out this baker’s dozen of tips; your machine will be zippier and less prone to performance and system issues.
6. Turn off search indexing
Windows 10 indexes your hard disk in the background, allowing you — in theory — to search your PC more quickly than if no indexing were being done. But slower PCs that use indexing can see a performance hit, and you can give them a speed boost by turning off indexing. Even if you have an SSD disk, turning off indexing can improve your speed, because the constant writing to disk that indexing does can eventually slow down SSDs.
To get the maximum benefit in Windows 10, you need to turn to index off completely. To do so, type services.msc in the Windows 10 search box and press Enter. The Services app appears. Scroll down to either Indexing Service or Windows Search in the list of services. Double-click it, and from the screen that appears, click Stop. Then reboot your machine. Your searches may be slightly slower, although you may not notice the difference. But you should get an overall performance boost.
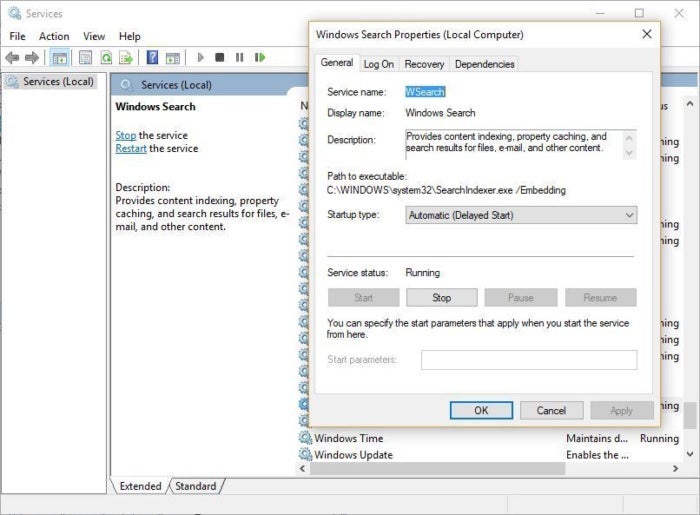
Here’s how to turn off Windows 10 indexing.
If you’d like, you can turn off indexing only for files in certain locations. To do this, type index in the Windows 10 search box and click the Indexing Options result that appears. The Indexing Options page of the Control Panel appears. Click the Modify button, and you’ll see a list of locations that are being indexed, such as Microsoft Outlook, your personal files, and so on. Uncheck the box next to any location, and it will no longer be indexed.
7. Clean out your hard disk
If you’ve got a bloated hard disk filled with files you don’t need, you could be slowing down your PC. Cleaning it out can give you a speed boost. Windows 10 has a surprisingly useful built-in tool for doing this called Storage Sense. Go to Settings > System > Storage and at the top of the screen, move the toggle from Off to On. When you do this, Windows constantly monitors your PC and deletes old junk files you no longer need — temporary files, files in the Downloads folder that haven’t been changed in a month, and old Recycle Bin files.
You can customize how Storage Sense works and also use it to free up even more space than it normally would. Underneath Storage Sense, click “Configure Storage Sense or run it now.” From the screen that appears, you can change how often Storage Sense deletes files (every day, every week, every month or when your storage space gets low).
You can also tell Storage Sense to delete files in your Download folder, depending on how long they’ve been there, and set how long to wait to delete files in the Recycle Bin automatically. You can also have Storage Sense move files from your PC to the cloud in Microsoft’s OneDrive cloud storage if they’re not opened for a certain amount of time (every day, or every 14 days, 30 days or 60 days).
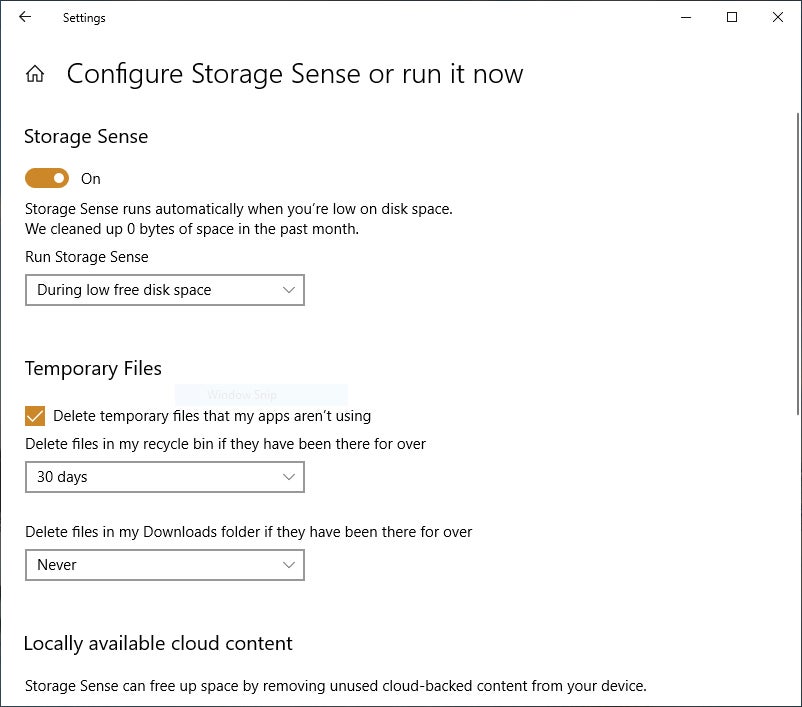
Here’s how to customize the way Storage Sense works, and to tell it to delete old versions of Windows.
You can also delete old versions of Windows that might be hogging space. At the bottom of the screen, check the box next to “Delete previous versions of Windows.” Storage Sense will then delete old versions of Windows ten days after you’ve installed an upgrade. Note that if you do this, you won’t be able to revert to the older version of Windows.
8. Clean out your Registry
Under the Windows hood, the Registry tracks and controls just about everything about the way Windows works and looks. That includes information about where your programs are stored, which DLLs they use and share, what file types should be opened by which program, and just about everything else.
But the Registry is a very messy thing. When you uninstall a program, for example, that program’s settings don’t always get cleaned up in the Registry. So over time, it can get filled with countless outdated settings of all types. And that can lead to system slowdowns.
Don’t even think of trying to clean any of this out yourself. It’s impossible. To do it, you need a Registry Cleaner. There are plenty available, some free and some paid. But there’s really no need to outright buy one because the free Auslogics Registry Cleaner does a solid job.
Before using Auslogics or any other Registry Cleaner, you should back up your Registry so you can restore it if anything goes wrong. (Auslogics Registry Cleaner does this for you as well, but it can’t hurt to have it backed up twice.) To do your own Registry backup, type regedit.ext in the search box, then press Enter. That runs the Registry editor. From the File menu, select Export. From the screen that appears, make sure to choose the “All” option in the Export range section at the bottom of the screen. Then choose a file location and file name and click Save. To restore the Registry, open the Registry Editor, select Import from the File menu, then open the file you saved.
Now download, install and run Auslogics Registry Cleaner. On the left-hand side of the screen, you can select the kinds of Registry issues you want to clean up — for example, File Associations, Internet or Fonts. I generally select them all.
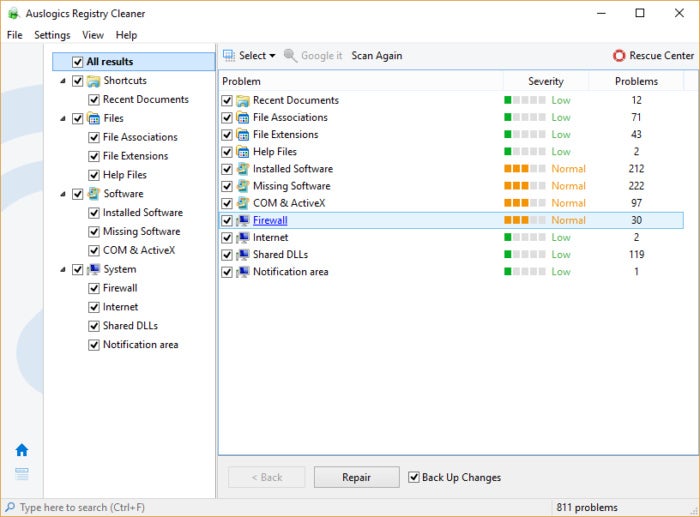
Auslogics Registry Cleaner scans for and fixes problems in your Windows Registry.
Next, tell it to scan the Registry for problems. To do that, click “Scan Now,” and from the drop-down menu that appears, select Scan. That lets you first examine the Registry problems it finds. If you instead choose “Scan and Repair,” it makes the fixes without you checking them.
It now scans your Registry for errors, then shows you what it found. It ranks the errors according to their severity to help you decide which to fix. Click Repair when you’ve made your decision, and make sure that “Back-Up Changes” is checked, so you can restore the Registry easily if something goes wrong.
9. Disable shadows, animations and visual effects
Windows 10 has some nice eye candy — shadows, animations and visual effects. On fast, newer PCs, these don’t usually affect system performance. But on slower and older PCs, they can exact a performance hit.
It’s easy to turn them off. In the Windows 10 search box, type sysdm.cpl and press Enter. That launches the System Properties dialogue box. Click the Advanced tab and click Settings in the Performance section. That brings you to the Performance Options dialogue box. You’ll see a varied list of animations and special effects.
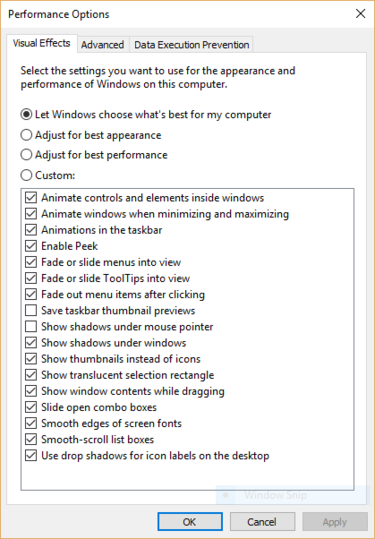
The Performance Options dialogue box lets you turn off effects that might be slowing down Windows 10.
If you have time on your hands and love to tweak, you can turn individual options on and off. These are the animations and special effects you’ll probably want to turn off, because they have the greatest effect on system performance:
- Animate controls and elements inside windows
- Animate windows when minimizing and maximizing
- Animations in the taskbar
- Fade or slide menus into view
- Fade or slide ToolTips into view
- Fade out menu items after clicking
- Show shadows under windows
However, it’s probably a lot easier to just select “Adjust for best performance” at the top of the screen and then click OK. Windows 10 will then turn off the effects that slow down your system.
10. Disable transparency
In addition to turning off shadows, animations and visual effects, you should also disable the transparency effects that Windows 10 uses for the Start menu, the Taskbar and the Action Center. It takes a surprising amount of work for Windows to create these transparency effects, and turning them off can make a difference in system performance.
To do it, from Settings, choose Personalization > Colors, scroll down to “Transparency effects” and move the slider to Off.
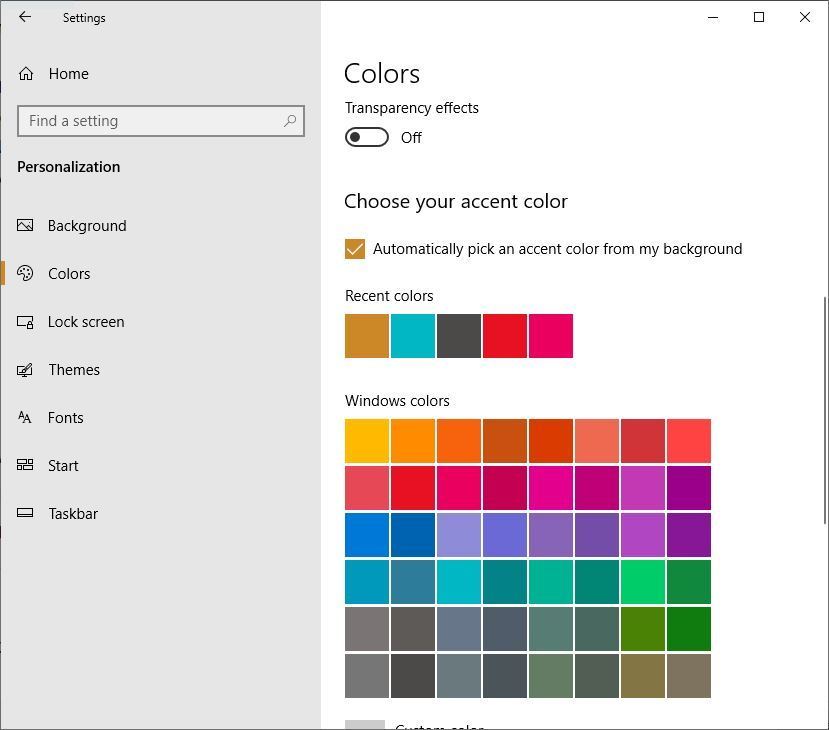
Turning off Windows 10’s transparency effects can help speed up performance.
We’re Urban Network, we can help save your Business.
We specialise in managed IT & technology services to help businesses across London & the wider-South East, from our base in Shoreditch.
Urban Network has a proven track record, with extensive experience and a full portfolio of industry accreditations & certifications.
Among our range of skills, we have a specialism in boosting Technology. Ensuring we aid our clients with employing the best & most appropriate practices, procedures and tools to increase efficiency in the workplace.
If you have any concerns or challenges with your technology generally, we would like to hear from you. Please contact the team today.
News Source: https://www.computerworld.com/


